Tuesday, November 24, 2015

Min Masterpieces Proposals

10/26/15 


Body mantle Project Statement

11/02/15

     This body mantle project was based on a design/art school project done throughout many schools, most mentionable, DAAP. The goal was to create not really an article of clothing, but more of an extension of the body, which was also wearable. This extension had to be created using no less than 100 items. In edition, the selected connectors (excluding any adhesive or binding material) had to equal the same length. While some used a connector(s) along with the material, others were connecting the materials to each other. My chosen material didn't allow me to do so. 

     I had chosen silk leaves, so my connector would have to be something thin enough to poke through the stem holes on the leaves or if a hole were to be poked through the silk material, it wouldn't tear the material. The most easily accessible type of wire available could've been gauge wire, due to the thickness and malleability of it. I decided to use floral wire instead.

    My first design was a pair of (fairy) wings with an armor chest "plate". It seemed like a good idea, and had a good sketch plan. Until I realized my time available to me... With all the twisting I had to do, strengthening and reinforcing the wire and all, I realized quickly I'd have to edit my design. It took almost a week to finish what would have made the top of the first wing. Half of one down- Five and a half wings more to go. It was Friday of the first week (with only a week of work time left) when I picked up the sketchbook again, working to a design with more possibility to be completed by the deadline. What was before a set of wings, had to become a hoop skirt. One that was inspired by "steampunk" design and fashion. It still incorporated the leaves on each "level" of the skirt. It was good because the length of what would be the wing was good for the bottom of the skirt. 

     Something about this project that was surprising that other than the big block of time almost "wasted" at the beginning, there weren't very many issues. The only issue was how much my wrist hurt after constantly turning it to twist the wire together. However that is something I'd have to sacrifice to art class. And one could say that tearing a hole in my tights was another issue, which I could agree with... but purchasing more pairs of tights was no big deal.

     I twisted the wire by taking about a foot of wire, bending over (totaling 2 feet , or 24 inches), then twisting the wire. After twisting the wire, I'd make another- which was still secured- and twist that together. I did this 8 times total for the bottom hoop, 6 times for the middle hoop, and 4 times for the top hoop. I added a "hook and loop" which could easily be both secured and opened quickly. Wire about the same length as the bottom hoop was used to section off each "level" of the skirt. To attach the various leaves, I took 6 inches of wire (uncut starting from the end of the wire's twisted length), then twisting that thin enough to poke through a hole in the stem (or leaf, depending on the type)that was there or made with an X-acto knife. I considered these vines which would make the hoops of the skirts.

Overall, I'm quite pleased. I would say one thing I would want to change about the overall design or appearance is that I wanted to make the appearance of a hoop skirt more obvious. I did use well over 100 silk leaves, so maybe using less- or at least at the ends of each hoop's vine. I may have used too many leaves which made each vine heavier, thus making it difficult to emphasize the skirt or its ability to grow bigger at the bottom. I think If I were to do this project again, exploring sewing would be something i'd be interested in.

Wednesday, October 14, 2015

Conversation Pieces Project Reflection

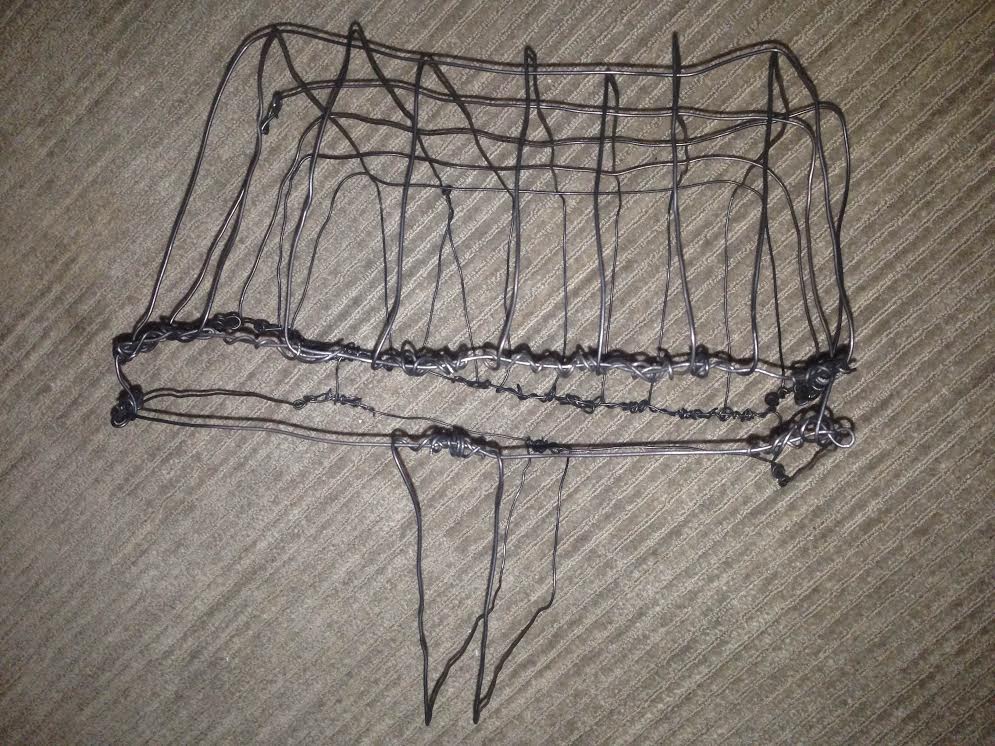
The original idea of this project was to "recreate" a household object using wire. The first part of the project was to create simply the object. The second part would be to create an abstraction piece, which would be the companion to the first piece. This project dealt with the context of shape, construction, and lines in space. 

         The wire as a material was difficult to work with, especially when constructing a basket, which involved weaving, twisting and securing the ends of wires in tight spaces, and straightening the pieces as I went along (which I would say after completing the piece, is a very obvious struggle still displayed). I started the first piece by constructing 3 rectangles, and creating the corners by vertically placing and twisting the pieces into place. This was the basic shape of the piece. I then attached the handle- made by two longer pieces of wire curved over the two longer sides of the baskets. Then came the most difficult part: weaving. I counted out 7 pieces along the length of the basket, with one which split into two smaller pieces on one side. I then counted 5 pieces along the width of the piece, and started weaving. I would say the most difficult part I found when starting the weaving process was making sure to alternate which pieces went under the frame and which pieces went above the frame at the ends, constantly reassuring that two pieces next to each other weren't both above or below, messing up the rest of the weaving process. I made this mistake later along the way when weaving the sides. Making this mistake seized me of much needed, very precious time, that was maybe used chatting with my friend in the studio and disproving the theory of multi-tasking. But of the first piece, the most difficult part would be the side weaving, due to the waste of material and loss of time.

         Onto the abstraction. This piece was a bit more fun, as it was easier. Once I'd learned and had come up with some ideas and techniques for weaving. Using prompts to fabricate ideas and sketches to become 3D companions. Multiple sketches were done, and some groups were even compiled into the final sketch design. Charcoal and Mylar paper were the key components for these sketches. Using prompts such as "to undo", "to reduce/ to dislocate", and "to allude/ to imply" for my brainstorm sketches in particular. My first design highlighted the prompt, "to undo", and would simply lay flat pieces of the basket, and weaving in a more 2D space. This would be done by simply creating 11 rectangles, which would dilate in size, framing each other, the weaving the width and length pieces into the rectangles. The handle would be the only part that was 3D.
However the design I ended up going through with, completed scratched out the idea of dilating the rectangles. The design involved creating 12 same-size rectangles, as well as a base, which would run along the bottom of the escalating rectangles. The base would be a balance and attachment piece for all the weaving pieces to attach to, which I found could be an easier and much quicker approach. Because the length pieces would be woven in a slanted direction, due to the stair-like appearance of the squares, I found it be much easier to place the pieces onto the top, pull the weaving pieces inside or outside the frame of the rectangle and push and secure each rectangle into place. This cut time and looked much better in the final design- from what I think, of course.


         The idea for this project is much like the idea of the masking tape shoe project. It would help the artist to understand what components make the piece. Unlike, trying to make the second piece look like the first, it was completely warped, but techniques to apply to it improved for the second pieces in both designs. The piece appeared as a 3D line drawing in the end. 


100 Objects Body Mantle Project Inspiration

The idea behind this project is to take 100 of the same, non-conventional, objects and make a piece of clothing or accessory using just that object, by attaching all of it together with one source (ex: wire, string, etc.). This project allows nothing under 100 objects, but can exceed 100.


Thursday, September 17, 2015

Shoes: The "good", the bad, and the ugly

least to most ridiculous shoes
Totem pole shoes. Probably the least ridiculous because of what males have been sporting lately.

Ive seen plenty of girls walk just fine in platform shoes. But the colors would suggest otherwise.


Cosplay shoes? People can walk around and have to stand for more than 12 hours at conventions. If you're willing to flaunt blisters for the next week, then do what you must.


These shoes are only good if you make it to the Nutcracker in the first place. The heels even play music and the ballerina spins inside the heel. 


Shoe Project Reflection


The Sole Of a Shoe
     The idea of this shoe project was to understand the shoe's structure and how it was built. This was helpful for structural design. Designers have to understand how something -in this case, the shoe- is built in order to achieve proper and adequate movement for possible future consumers. 
     I started with the sole by layering 2 pieces of  masking tape. Tracing the soles of the pair of shoes, and pressing the adhesive sides of both together.  4 pieces had to be made for the top and bottom of the sole. for the thickness of the sole, tape was torn and crumpled. After, that, I began building up the shoe, simply by placing pieces of tape around the sole, horizontally. In order to achieve the bulb-part of the heel, the upper piece of tape was cut into slits, and bent outwards, secured by tape. Another piece of tape was bent inwards and the slits on the tape was secured together, getting the final shape. The toe box(front of the shoe) assisted in the lift of the toe. Ib was a very simple look to achieve. the two end s of the tape were bent back and taped to the top of the sole creating a loop, where the adhesive was covered by another strip, this was repeated until the entire toe bow was completed. For the top of the shoe, which appears as 3 roll-shaped pieces layered together, I did just that by pressing small pieces of tape into separate pieces and lining them on a piece of tape, then folding the piece of tape over. As I had to tape the 3 rolls (piece upon piece), they lost their shape, an awl was used to indent into the space between each attached roll. for the suede detailing, tape was again layer into a 'y' shape and 'U' shape. A small awl was used to poked (detail) holes in the sides.
     The second shoe had much improvement from the first. The basic shape of the shoe was much cleaner, and understanding what can have (negative or positive) effects on the adhesion of the tape helped me proficiently and thus efficiently construct the partner shoe. An example: on the first shoe, I used Mod Podge to get the shiny look that the actual shoe's metallic fabric has. Upon *attempting* to attach the pieces which resemble the suede panels on the shoe, they would not adhere permanently to the side. I overcame his with a fresh piece of tape with better bond- since it hadn't been on the cutting mat. Another problem I had was getting the shoe laces through the grommets.The small awl was used at first because the shoe has very small holes.but because of the difficulty that was presented when trying to lace the shoes, a hole punch was used much later. Due to the design of the shoe laces being much wider than most other shoes, aglets were added to make it easier to feed through the holes.
     Overall, it was very challenging to create a pair, because once you know what works and doesn't work, its very hard to apply that to the second shoe, without making it look drastically different. Such as certain pointers were discarded because they couldn't be applied to the first (finished) shoe, and applying them could possibly change the form of the shoe or somehow alter the viewers final perception of the piece. Its important to use 1-tone or no-tone (as in my case, Mod Podge) materials to recreate apparel. This project showed me that I didn't know as much about a shoes structure as I thought.